
PSA: It takes me almost as long to write one of these posts as it does to prepare for the parties. Bear with me. It's only been 5 months.
My, how the time flies. it seems like just yesterday I was helping one of my best friends plan her baby's shower- and here I am today, a year later, gifted with an adorable niece and the opportunity to help organize a celebration for Christina and Nic surviving year 1. It only took 6 months of deliberation, but we finally got Nic to let go of “where the wild things are” (I hate that book- sorry not sorry) and agree on another one of Christina’s suggested themes: “adventure”. Easy enough; right?
Of course not. Why would I be asking that question if it was that easy? The “adventure” theme posed more of an issue than I could have ever thought it would. I never realized that adventure could’ve interpreted in a thousand different ways: is it an adventure in the woods? Adventure in the jungle? Modern minimalist adventure? Vintage maps and machines adventure?
You get get the idea. Because I hadn't realized this at first, Christina sent out very chic, modern adventure invitations. Meanwhile, I had already started making decorations with vintage map paper. So now I was left with the question that would plague me until the day of the party: how do you combine modern and vintage adventure themes for a party? Keep reading and you'll see. Spoiler alert: I'm proud of myself.

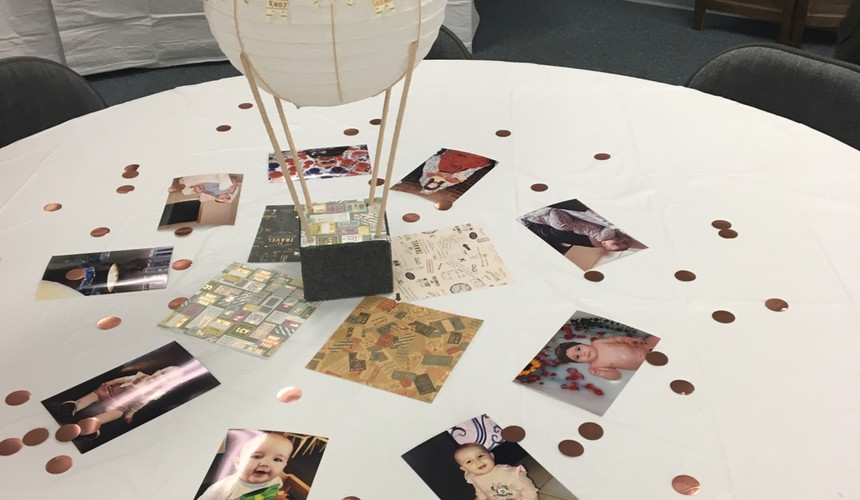
Centerpieces
This was one of the staples of this party. Often, when we're looking at potential themes, we fall in love with some things and decide they must be a part of our party- and these adorable hot air balloon centerpieces were no exception. Christina and I both knew we had to have them immediately, and I set out on a quest. Note: this project is not for the faint of heart. It took probably an hour per balloon (including all of the adorable finishing touches- shoutout to Nic for sitting there with a fork making all those adorable bows!). While I would have preferred to use little baskets for the bases, time was running out and little foam squares were the most economic option.
The little flag/pennant garlands were definitely what made , and I made them with the same paper that I used for my full-size garlands, and in the same shape. That way, I could create some continuity in the room.
The inspiration:

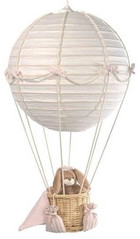


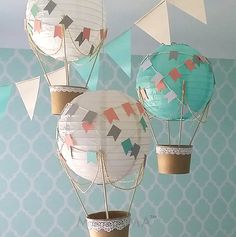


The real deal:


Clouds
I had already had an eye on this DIY for years before this- and it just so happened to be perfect for this theme, so right away, I began by making clouds for whatever dessert/activity tables we were going to have set up. Those of you who follow me on Instagram (@thecreativecoachmonica) got to see the whole process (and I can make a blog post about it here if you'd like to see it broken down step-by-step, just let me know). Basically, it required organized chaos between some Chinese paper lanterns and pillow stuffing. Notes if you choose to do this: symmetry is your worst enemy (I wish I'd made just one more!!) Also, these look AMAZING with lights in them. If you want to try them that way I'll show you the ones I got off Amazon (before I realized it was a daytime party and super bright in that space).
Although we hadn't had to confront the modern v. traditional adventure theme conundrum yet, these lean a little bit toward the traditional adventure theme that includes countless details and life-like props. But, as it worked out, these helped bring together both themes in being both detailed and realistic while also being minimal.
The clouds proved to be a little complicated. I'll admit that I had not thought about that. Bring some clear fishing line and some paper clips if you'll be dealing with a normal ceiling. Note that the fishing line doesn't have to hang straight down- it can be pulled amongst different ceiling tiles to adjust the location.
The inspiration:


The Creative Coach Monica:


Mountains
After I finished the clouds, I figured that the next thing to conquer would be some scenery. Now... this is about the time that I realized that this theme was going to be a little bit more complicated. As I worked on making this cardboard mountain range (which I later realized would only curl because of how much paint they required), I realized that things were taking a turn for the "modern", and Christina's boards kept getting more and more minimalist. So I took the hints and picked up some cones from Michael's that made the quickest, easiest, and most minimal mountains ever. Those are the ones we used for decoration around the dessert table.
You'll also notice that with the extra "cloud material", I decorated around the mountains to create the illusion of being above the clouds. It was such an easy thing to do, but made such a massive improvement in terms of tying things together and making everything look intentional.
The inspiration:


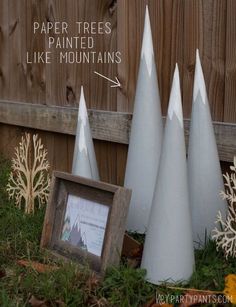
The Creative Coach Monica:


Garlands
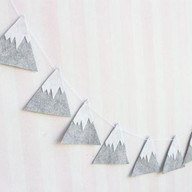
We all know by now that I love me some garlands.These ones were so, so simple- and the mountains turned out so cute that now they hang above Kaia's bed!
The inspiration:


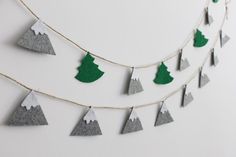

The Creative Coach Monica:


Map Letters
As I've talked about in previous posts, one of my favorite things to do for parties is draw attention to the person we're celebrating in the first place- to keep everyone in the present moment and in a spirit of appreciation. In order to do that, I like creating cute ways to display the name of the person of honor, and in this case, my super simple mod-podge letters did the trick with some vintage map paper. If you'd like the step-by-step instructions, let me know!
The inspiration:


The Creative Coach Monica:

Signs
I was so glad to have Christina's help with the chalkboard signs- those ones had a transportation motif, while the others were simply quotes. I can't remember why I chose antique notebook paper over map print, but hey, here they are.
The inspiration:


The Creative Coach Monica:


Dessert Table
As the main focal point of the party, the dessert table was where the two themes - vintage adventure and modern adventure - had to come together. I achieved this through painting the mountains minimally, and in colors that matched the vintage maps I had used to create Kaia's name. Those colors all were perfectly coordinated with my garlands, too, in the hopes that keeping the color palette consistent would make up for the modern/antique discrepancy in the theme.
The inspiration:


The Creative Coach Monica:


The Whole Adventure was adorable- quite possibly my proudest moment in party planning yet- and despite the constant worries, it turned out just perfect. But, as always, there is no way I could have done it without my constant support systems: my family and friends. They keep me sane, keep me inspired, and keep me focused on the joy of the occasion (instead of the madness of DIY-ing).
There were so many tiny details that I could never explain them all- and the photos above wouldn't do it justice. Click through the gallery below to see all of the adorable details and get some ideas for your next event! As always, if you want to see tutorials on how I made any of these DIY dreams come true, shoot me an email or comment. I'd be glad to show you how I made it happen.


Comments